> ## Documentation Index
> Fetch the complete documentation index at: https://developers.sendlayer.com/llms.txt
> Use this file to discover all available pages before exploring further.
# SendLayer MCP Server
> Learn how to use the SendLayer MCP server to send email and manage webhooks/events directly from AI tools like Cursor and Claude.
## Overview
The SendLayer MCP server exposes tools for sending email and managing webhooks/events using the SendLayer Node.js SDK. You can use it from AI tools like Cursor and Claude to run local scripts, chat with an AI model, and send results to yourself or your team without wiring up HTTP calls manually.
## What Is MCP?
MCP (Model Context Protocol) is a protocol that allows AI tools to interact with external services and data sources. It's a way to extend the capabilities of AI tools by allowing them to use external tools and data sources.
## Tools
* **send-email**: Send a message (plain text or HTML) with CC/BCC, reply-to, tags, headers, and attachments.
* **get-events**: Query events with optional filters.
* **list-webhooks**: List registered webhooks.
* **create-webhook**: Create a webhook.
* **delete-webhook**: Delete a webhook by ID.
## Prerequisites
* A SendLayer account and API key ([get your API key](https://app.sendlayer.com/))
* A verified sending domain ([authorize your domain](https://sendlayer.com/docs/authorizing-your-domain/))
* Cursor or Claude Desktop installed
## Connecting to the MCP Server
The easiest way to get started is to connect to the hosted SendLayer MCP server. No local installation is required.
### Cursor
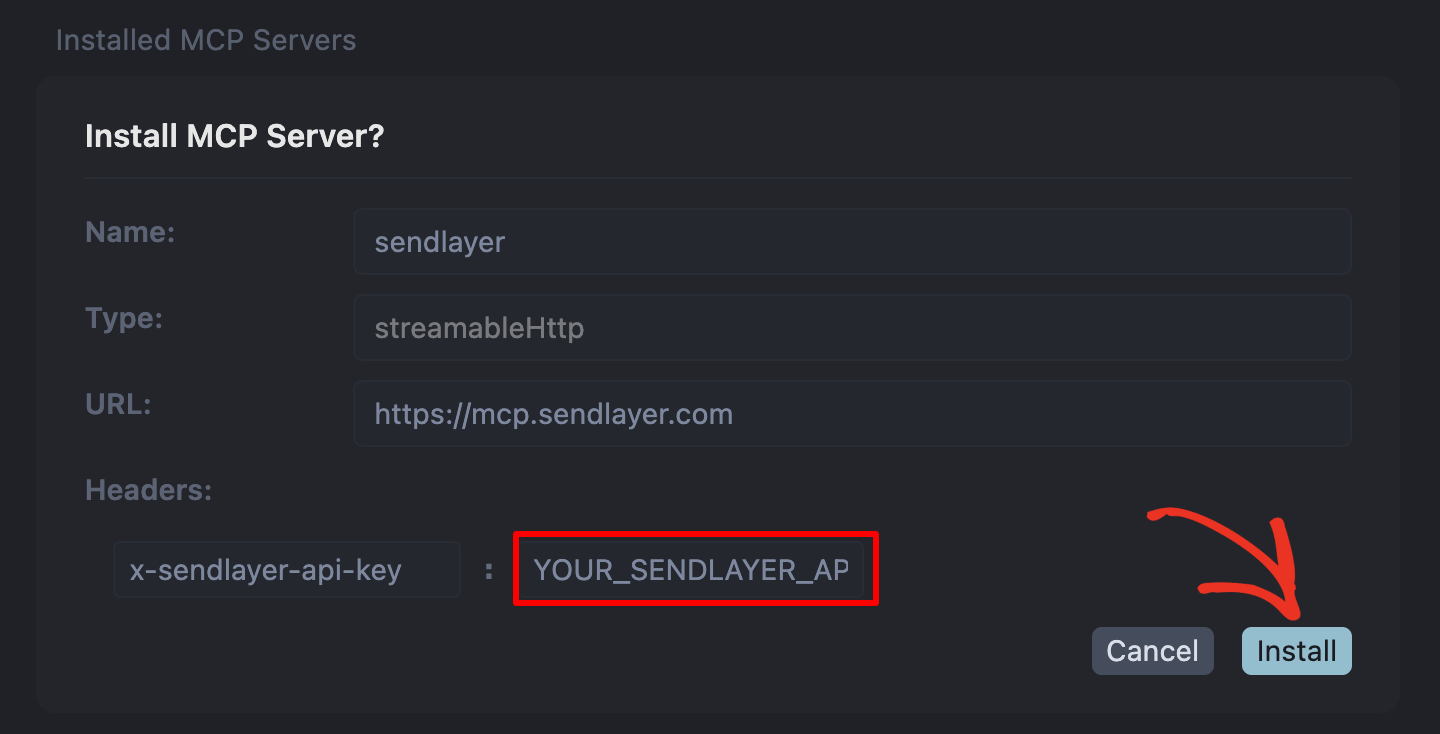
Use the direct link below to install the MCP server in Cursor:
[](https://cursor.com/en-US/install-mcp?name=sendlayer\&config=eyJ0eXBlIjoidXJsIiwidXJsIjoiaHR0cHM6Ly9tY3Auc2VuZGxheWVyLmNvbSIsImhlYWRlcnMiOnsieC1zZW5kbGF5ZXItYXBpLWtleSI6IllPVVJfU0VORExBWUVSX0FQSV9LRVkifX0%3D)
This will open the MCP server installation page in Cursor. Enter your SendLayer API key and click **Install**.
 #### Manual Installation
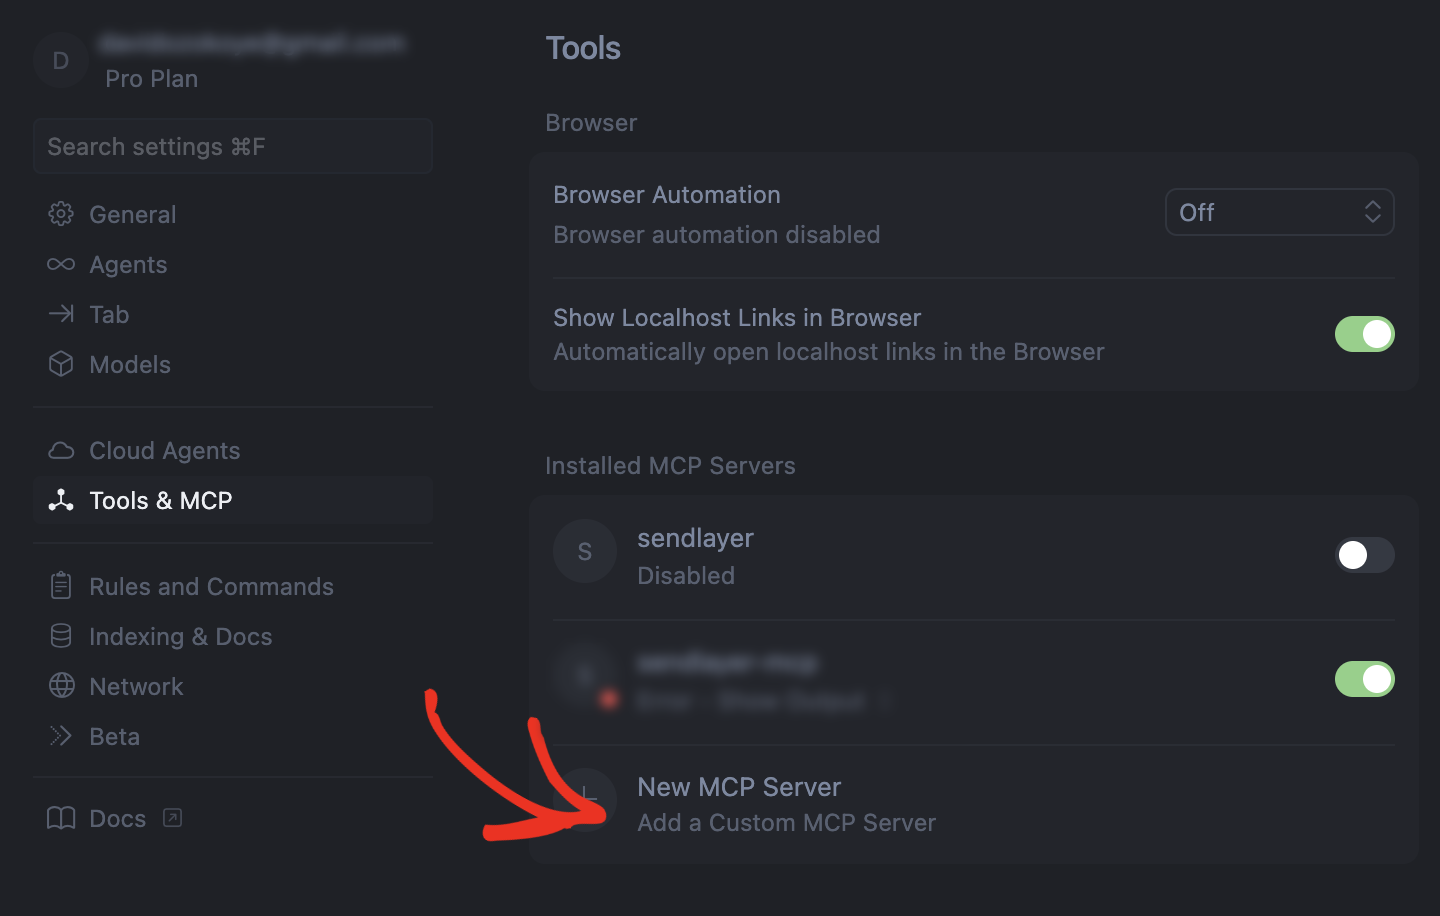
If you're not using the direct link, open the command palette (`cmd`+`shift`+`p` on macOS or `ctrl`+`shift`+`p` on Windows) and choose **Cursor Settings**.
Then, select **Tools & MCP** from the left sidebar and click **New MCP server**.
#### Manual Installation
If you're not using the direct link, open the command palette (`cmd`+`shift`+`p` on macOS or `ctrl`+`shift`+`p` on Windows) and choose **Cursor Settings**.
Then, select **Tools & MCP** from the left sidebar and click **New MCP server**.
 In the `mcp.json` file, add the following config:
```json theme={null}
{
"mcpServers": {
"sendlayer": {
"type": "url",
"url": "https://mcp.sendlayer.com",
"headers": {
"x-sendlayer-api-key": "YOUR_SENDLAYER_API_KEY"
}
}
}
}
```
Be sure to replace `YOUR_SENDLAYER_API_KEY` with your actual SendLayer API key from `app.sendlayer.com`.
After saving the file, restart Cursor and verify the MCP server is connected. You can now use commands like “send an email to [recipient@example.com](mailto:recipient@example.com)” in Agent mode.
### Claude Code
Run the following command on your terminal to configure the MCP server:
```bash theme={null}
claude mcp add --scope user --transport http sendlayer-mcp https://mcp.sendlayer.com --header "Authorization: Bearer YOUR_SENDLAYER_API_KEY"
```
Be sure to replace `YOUR_SENDLAYER_API_KEY` with your actual SendLayer API key.
### Gemini-CLI
Open a terminal and run the following command to edit your `~/.gemini/settings.json` file:
```bash theme={null}
nano ~/.gemini/settings.json
```
Then, add the following lines to the file and save it:
```json theme={null}
{
"mcpServers": {
"sendlayer": {
"httpUrl": "https://mcp.sendlayer.com",
"headers": {
"x-sendlayer-api-key": "YOUR_SENDLAYER_API_KEY",
"Content-Type": "application/json"
},
"timeout": 5000
}
}
}
```
Be sure to replace `YOUR_SENDLAYER_API_KEY` with your actual SendLayer API key.
To test the connection, run the following command:
```bash theme={null}
gemini mcp list
```
You should see the `sendlayer` server in the list. You can now use the `sendlayer` server to send emails and manage webhooks/events.
### Windsurf
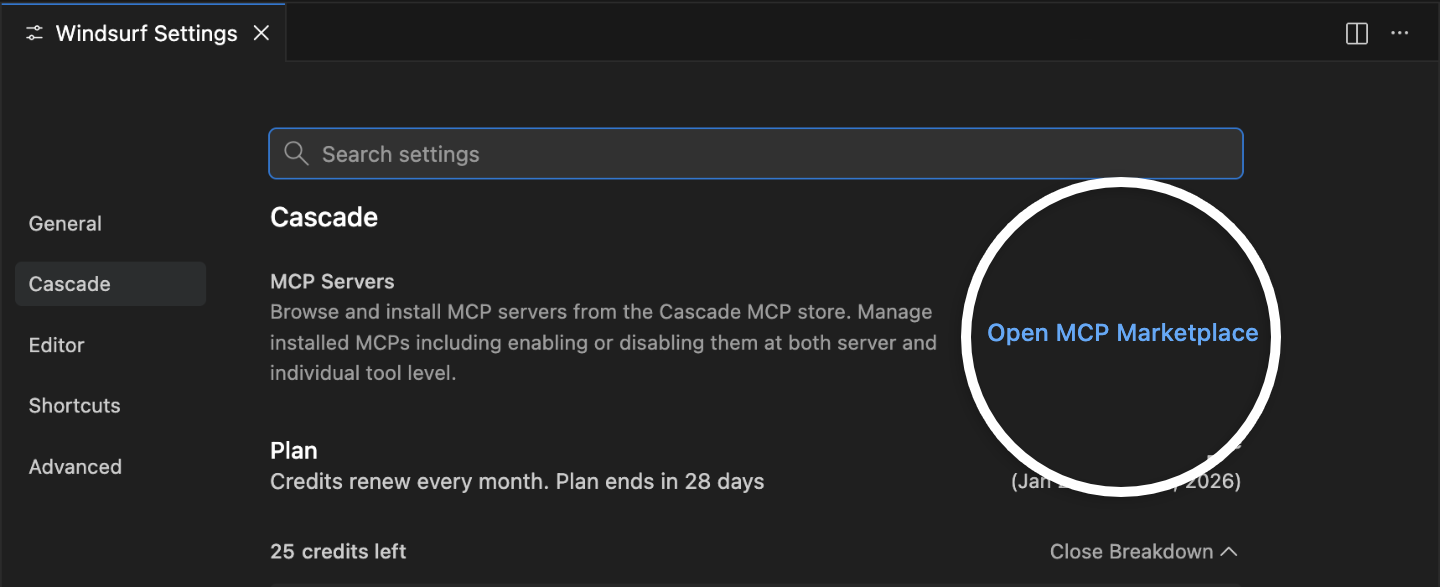
Open your Windsurf settings page. Then select the **Cascade** sidebar menu and click **Open MCP Marketplace**.
In the `mcp.json` file, add the following config:
```json theme={null}
{
"mcpServers": {
"sendlayer": {
"type": "url",
"url": "https://mcp.sendlayer.com",
"headers": {
"x-sendlayer-api-key": "YOUR_SENDLAYER_API_KEY"
}
}
}
}
```
Be sure to replace `YOUR_SENDLAYER_API_KEY` with your actual SendLayer API key from `app.sendlayer.com`.
After saving the file, restart Cursor and verify the MCP server is connected. You can now use commands like “send an email to [recipient@example.com](mailto:recipient@example.com)” in Agent mode.
### Claude Code
Run the following command on your terminal to configure the MCP server:
```bash theme={null}
claude mcp add --scope user --transport http sendlayer-mcp https://mcp.sendlayer.com --header "Authorization: Bearer YOUR_SENDLAYER_API_KEY"
```
Be sure to replace `YOUR_SENDLAYER_API_KEY` with your actual SendLayer API key.
### Gemini-CLI
Open a terminal and run the following command to edit your `~/.gemini/settings.json` file:
```bash theme={null}
nano ~/.gemini/settings.json
```
Then, add the following lines to the file and save it:
```json theme={null}
{
"mcpServers": {
"sendlayer": {
"httpUrl": "https://mcp.sendlayer.com",
"headers": {
"x-sendlayer-api-key": "YOUR_SENDLAYER_API_KEY",
"Content-Type": "application/json"
},
"timeout": 5000
}
}
}
```
Be sure to replace `YOUR_SENDLAYER_API_KEY` with your actual SendLayer API key.
To test the connection, run the following command:
```bash theme={null}
gemini mcp list
```
You should see the `sendlayer` server in the list. You can now use the `sendlayer` server to send emails and manage webhooks/events.
### Windsurf
Open your Windsurf settings page. Then select the **Cascade** sidebar menu and click **Open MCP Marketplace**.
 Then, click the settings icon to open the `mcp_config.json` file.
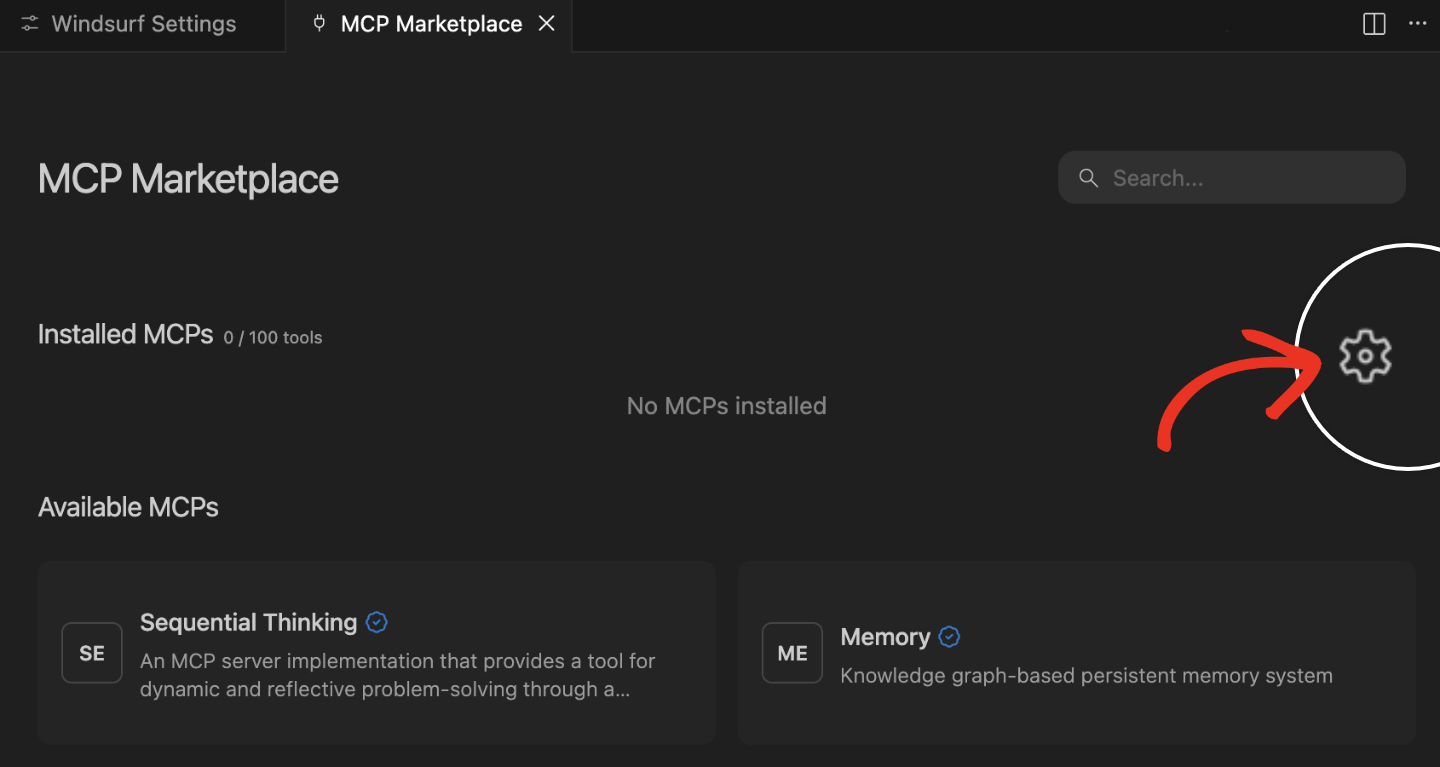 Once the file is open, add the following lines to the file and save it:
```json theme={null}
{
"mcpServers": {
"sendlayer": {
"serverUrl": "https://mcp.sendlayer.com",
"headers": {
"x-sendlayer-api-key": "YOUR_SENDLAYER_API_KEY"
}
}
}
}
```
Be sure to replace `YOUR_SENDLAYER_API_KEY` with your actual SendLayer API key.
## Features
* Send plain text and HTML emails
* Send emails with attachments
* Add CC and BCC recipients
* Customize the sender email (verified domains only)
* Create, list, and delete webhooks
* Retrieve and filter email events
Once the file is open, add the following lines to the file and save it:
```json theme={null}
{
"mcpServers": {
"sendlayer": {
"serverUrl": "https://mcp.sendlayer.com",
"headers": {
"x-sendlayer-api-key": "YOUR_SENDLAYER_API_KEY"
}
}
}
}
```
Be sure to replace `YOUR_SENDLAYER_API_KEY` with your actual SendLayer API key.
## Features
* Send plain text and HTML emails
* Send emails with attachments
* Add CC and BCC recipients
* Customize the sender email (verified domains only)
* Create, list, and delete webhooks
* Retrieve and filter email events